Creating Custom Component in Talend Open Studio
What a component is?
Graphically it is an icon which you drag from palette to the work place. But technically it is a file folder which has the same name of the component i.e (component name = custom component file folder name). So will call this as component folder.
Where this component folder located in Talend when you install?
It is in: TOS_DI-Win32-r117820-<VERSIONNAME> \plugins\org.talend.designer.components.localprovider_<VERSIONNAME>\components
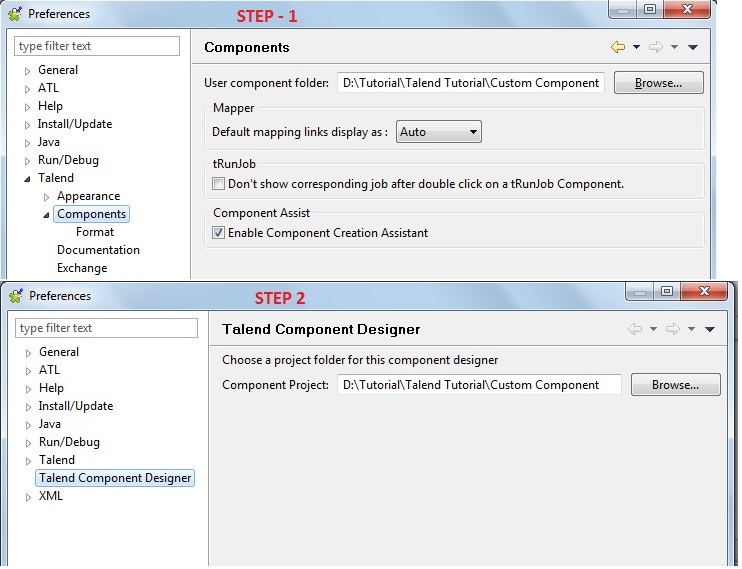
To start, we need a component designer but before to it first task is to create a “Custom Component” folder somewhere handy on your disk.
Now we need to locate the custom component folder path with in Talend such that component designer gets enabled or Opens.
 Now you should be able to see a two different perspectives 1) Data Integration 2) Component Designer. You can switch from one to the other with small table like icon on the top right part when ever you need. It can also be accessible from “Window->Perspective”.
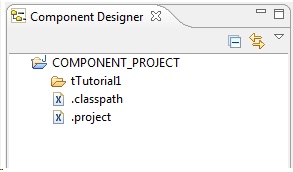
Select Component Designer Perspective, a pane should appear with list of projects don’t worry if it is empty , that’s because we did not develop any component yet, However you should be able to see a “Component_Project”.
First component:
First component name is tTutorial1, that’s the first information we need because we will create a directory with the same name in our Custom Components folder, directly in the file system. Now, Hit F5 or “refresh” the menu to look at the tTutorial1 component.
To install a custom component, from the Component Designer, the “push components to palette” is used.The studio will attempt the installation of ALL the components visible under the COMPONENT_PROJECT root node.
Each (java) component must have a descriptor XML file stored in the component folder, this file must have the same name of the component, plus a _java suffix and .xml extension.
In our case we will create tTutorial1_java.xml. This element is really key in a component, it allows the studio to understand what the component is supposed to do and how it can interact with other components.
The structure of the xml descriptor file is defined and some parts are mandatory, we will start with them.
<?xml version="1.0" encoding="UTF-8"?>
<COMPONENT>
<HEADER AUTHOR="Dasari"
    COMPATIBILITY="ALL"
    PLATEFORM="ALL"
    SERIAL=""
    STARTABLE="true"
    STATUS="BETA"
    VERSION="0.1">
    <SIGNATURE/>
 </HEADER>
<FAMILIES>
<FAMILY>Tutorial</FAMILY>
</FAMILIES>
<DOCUMENTATION>
<URL></URL>
</DOCUMENTATION>
<CONNECTORS>
<CONNECTOR CTYPE="FLOW"/>
</CONNECTORS>
<PARAMETERS>
</PARAMETERS>
<CODEGENERATION/>
<RETURNS>
</RETURNS>
</COMPONENT>
Copy & paste the above code into a text file called tTutorial1_java.xml in your Custom Components/tTutorial1 folder.
you need at least another file in order to make the component visible in the palette : the message properties file. it is a java .properties file and it is mandatory, it will look initially something like this :
#
#Wed July 30 12:03:50 IST 2014
HELP=org.talend.help.tTutorial1
LONG_NAME=Tutorial component 1
Copy & paste the above code into another text file in the same directory, that you will save as tTutorial1_messages.properties, and now push the components to the palette.
In the bottom right part of your application window you should see a message saying Generation engine initialization in progress, get used to it because you are going to see it quite a few times.
Switch to “Data Integration” perspective and find the component from palette.If you cannot see in palette, simply create an empty project and a new job.
Now it will generate a null pointer Exception. So, what’s causing the null pointer error now? What’s missing? That should be visible directly in the palette : your component is missing an icon (which, for a graphical tool is quite important).
Download the attached picture and save it as tTutorial1_icon32.png in the component folder. Now again refresh and Push the component into palette.
Finally this time, your component should be visible in the palette. 
A component needs a minimum Files:
1) The xml descriptor file
2) The messages properties file
3) An icon file, to be succesfully installed in the palette
Reference:
[1] http://www.powerupbi.com/talend/componentCreation_3.html

Best Open Source Business Intelligence Software Helical Insight is Here