Talend Enterprise Studio for DI installation using Installer
This post provides the information about the following topics on Talend Enterprise Studio for Data Integration r.
- Installation Requirements
- Introduction to the Talend products
- Talend Enterprise Studio Installation (Using Installer)
1. Installation Requirements:
To make the most out of the Talend products, please consider the following hardware and software requirements.
Hardware Requirements:
Memory usage heavily depends on the size and nature of your Talend projects. However, in summary, if your Jobs include many transformation components, you should consider upgrading the total amount of memory allocated to your servers, based on the following recommendations.
Table 1.1. Memory usage
| Product | Client/Server | Recommended alloc. memory |
| Talend Administration Center + Talend Activity Monitoring Console Web application | Server | 4GB minimum, 8GB recommended |
| CommandLine | Server | 2GB minimum, 5 GB recommended |
| JobServer | Server | 1GB minimum, more recommended1 |
| Studio | Client | 3GB minimum, 4 GB recommended |
| Talend Runtime | Server | 2GB minimum, 4 GB recommended1 |
1. Memory requirements depend on the executed processes.
The same requirements also apply for disk usage. It also depends on your projects but can be summarized as:
Table 1.2. Disk usage
| Product | Client/Server | Required disk space for installation | Required disk space for use |
| Talend Administration Center with Nexus and Archiva artifact repositories + Talend Activity Monitoring Console Web application | Server | 800MB + more than 50MB for Talend Activity Monitoring Console Web application | 800MB minimum + project size = 20GB+ recommended |
| CommandLine | Server | 3GB | 2GB minimum + project size = 20 GB+ recommended |
| JobServer | Server | 20MB | 2GB minimum + Jobs deployed = 20+ GB recommended |
| Studio | Client | 3GB | 3+ GB |
| Talend Runtime | Server | 400MB | 400+ MB |
Software requirements:
The following software and modules are properly set up on the station where we are trying to install the Talend modules:
- Operating System Linux 32/64 bits, Windows 32/64 bits or Mac OS X
- JDK 1.6.0 or higher must be installed
Note: Talend Installer automatically checks for JDK version 1.6 or higher version. If no instance of JDK is found, the installer will shut down.
- .NET version 2 to version 3.5 is required by Talend Installer to install services on Windows;
- (Optional) a mail server (to send notifications by email).
Environment variable configuration: on Windows
Prior to installing your Talend solutions, you have to set the JAVA_HOME Environment variable:
- Define your JAVA_HOME environment variable so that it points to the JDK directory.
- Example: if the JDK path is C:\Java\JDKx.x.x\bin, you must set the JAVA_HOME environment variable to point to:C:\Java\JDKx.x.x.
- If you use Talend Installer, you also have to set the Path system variable:
- Add the previously defined JAVA_HOME variable to the Path environment variable.
- Example: <PathVariable>;%JAVA_HOME%\bin.
2. Introduction to the Talend products:
The present section lists all the elements required for using the Talend products. To ease their management, we recommend you to centralize all the server modules on one single system.
- An application server (Apache Tomcat server + CommandLine) that hosts Talend Administration Center.
- A database server storing the administration metadata of Talend Administration Center (by default, an embedded H2 database is used).
- An SVN server for Project metadata.
- A Web browser to access Web application:
- Talend Administration Center where projects, users and processes can be managed and administrated.
- An artifact Repository (based on Apache Archiva) for software updates.
- Execution servers (JobServers) or Talend Runtime execution containers (based on Apache Karaf) to deploy and execute processes.
- A Studio API to carry out technical processes
A Talend Activity Monitoring Console, providing detailed monitoring capabilities that can be used to consolidate the collected log information.
3. Talend Enterprise DI installation using Installer:
After downloading Talend-Tools-Installer-rYYYYY-VA.B.C-installer.zip, we need to extract it to see a dist and four executable files under same directory like below.
Talend-Tools-Installer-rYYYY-VA.B.C-windows-installer.exe for 32-bit and 64-bit Windows users,
Talend-Tools-Installer-rYYYY-VA.B.C-linux-installer.run and Talend-Tools-Installer-rYYYYY-VA.B.C-linux64-installer.runfor 32-bit or 64-bit Linux users respectively,
Talend-Tools-Installer-rYYYYY-VA.B.C-osx-installer.app in the .tar file called Talend-Installer-Tools-rYYYYY-VA.B.C-osx-installer.app.tar for MacOS users
Note: YYYY is the revision number and A.B.C is the revision level (Major.Minor.Patch).
From the above executable files select the Talend-Tools-Installer-rYYYY-VA.B.C-windows-installer.exe and launch the installation process by double clicking on it.

Click on next button will pop up a license agreement window like below and accept it.

Installation types and styles
Three installation types are available:
- The Server type: allows you to install all Talend server components with default configuration.
- The Client type: allows you to install the Talend Studio.
- The Custom type: allows you to select and configure the Talend solutions that will be installed.
By default, the Easy install option is selected and will install the Talend solutions with default configuration (default local host, default ports and so on) without asking you for any information. Before performing this installation, make sure the default ports are not used by other applications.
Advanced Installer will give the option to customize the individual talend product configuration according to the requirement.
Setting up the installer based on the Easy Install:

Select the valid license file path and click on next will validate the license file.

After validating the license file, it will show all the list of talend products and their confirmation.
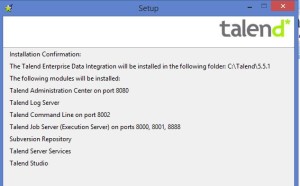
Now the setup is ready to begin installing based on the default configuration.

Click on next will install all the talend products and click on finish once the installation is done.
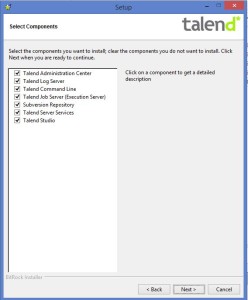
Setting up the installer based on the Advanced Install:

Select the talend products from the list and click on next button will show a new window with email server configuration.
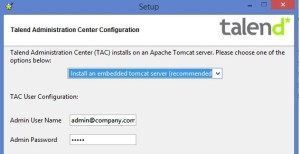
Talend Administration Center (TAC) Configuration:
Configure the admin user details for the TAC web application login through the browser.
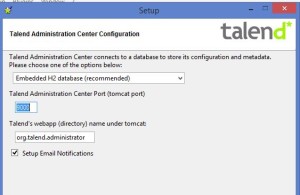
Email Notifications Configuration:
If we want to get the email notifications from the TAC then we need to enable the Setup Email Notifications option and configure the required email server details like below.

Log Server Configuration:
Below are the two types of configurations available.
- Use TAC Tomcat
- Use Customer Tomcat (6/7)
Use TAC Tomcat: Log server will also use the same tomcat which is configured for the TAC.

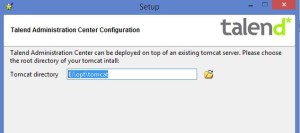
Use an existing tomcat server:
We need to specify the existing tomcat directory location here.
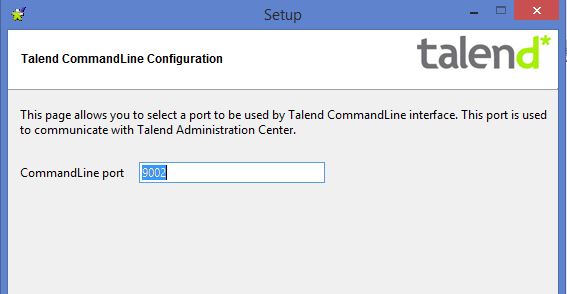
Command line configuration:
Job Server Configuration:

Subversion Repository configuration:

Select the type of svn you want to install from the drop down and below are the available options.
- I will configure my SVN server later.
- Use an existing svn server
- Install an svn server locally (Linux only)
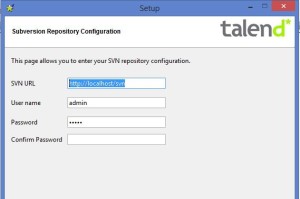
Use an existing svn server:
Configure all the svn server details as shown in the picture .
Services Installation:
This option will give use to setup the Talend components as a system service. The application will automatically start at system startup when we install a component as a service.

Now the setup is ready to begin installing all the selected Talend products on our computer.

We are done.!!! Talend Enterprise studio is successfully installed now.Just go to the installation directory and launch Talend studio by clicking on the appropriate launcher depends upon the operating system.
If you are looking for my next post on Talend Administration Center Configuration click here
Thanks,
Sayagoud Ravelly

Best Open Source Business Intelligence Software Helical Insight is Here
Is it possible to have trail version of talend studio and TAC?