AWS QuickSight, a cloud-native business intelligence tool, offers seamless connectivity to various data sources, allowing users to analyze and visualize data effortlessly. In this blog, we will walk you through the step-by-step process of connecting with data sources in AWS QuickSight.
Step 1: Sign in to AWS QuickSight
To begin, visit the AWS QuickSight console (https://quicksight.aws.amazon.com/) and log in using your AWS account credentials. Once logged in, you’ll have access to the QuickSight interface and its powerful features.
Step 2: Create a New Analysis
In the QuickSight console, click on the “New Analysis” button to start a new analysis or select an existing analysis where you want to connect a new data source. This will open up the analysis workspace where you can build your visualizations and reports.
Step 3: Choose a Data Source
In the data source selection screen, click on “New data set” to connect to a new data source. QuickSight provides a range of options to connect with different data sources, including Amazon S3, Amazon Athena, Amazon Redshift, and more. Select the appropriate data source based on your requirements.
Step 4: Configure Data Source Settings
Based on the chosen data source, you’ll need to provide specific information to establish the connection. Here’s a breakdown of a few common data sources:
Amazon S3: Specify the S3 bucket and folder path where your data resides. Choose the data format, such as CSV, Excel, or JSON. Configure options like delimiter, header row, and data types.
Amazon Athena: Select the Athena database and table or specify a custom SQL query. Define any required parameters like encryption settings or database credentials.
Amazon Redshift: Provide the Redshift cluster details, including host, port, database name, and credentials. Optionally, specify an SQL query or choose specific tables to import.
The configuration steps may vary depending on the selected data source. QuickSight provides an intuitive interface to guide you through the process.
Here we can see, how to connect from QuickSight to Databricks.
To connect to Databricks:
• Begin by creating a new dataset. Choose Datasets from the navigation pane at left, then choose New Dataset.
• Choose the Databricks data source card.
• For Data source name, enter a descriptive name for your Databricks data source connection, for example Databricks CS. Because you can create many datasets from a connection to Databricks, it’s best to keep the name simple.
The following screenshot shows the connection screen for Databricks.
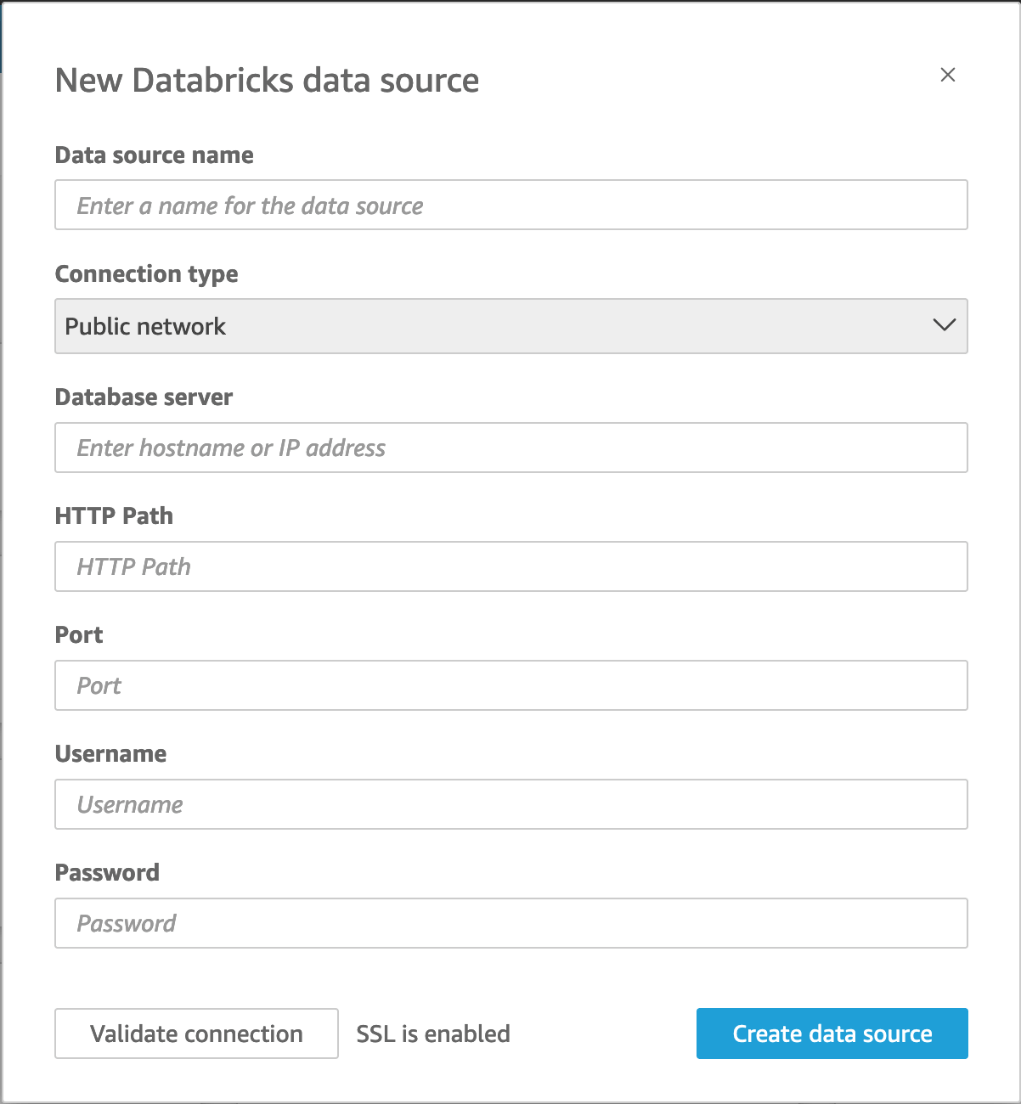
• For Connection type, select the type of network you’re using.
1. Public network – if your data is shared publicly.
2. VPC – if your data is inside a VPC.
Note: If you’re using VPC, and you don’t see it listed, check with your administrator.
• For Database server, enter the Hostname of workspace specified in your Databricks connection details.
• For HTTP Path, enter the Partial URL for the spark instance specified in your Databricks connection details.
• For Port, enter the port specified in your Databricks connection details.
• For Username and Password, enter your connection credentials.
• To verify the connection is working, click Validate connection.
• To finish and create the data source, click Create data source
Adding a new QuickSight dataset for Databricks:
After you have an existing data source connection for Databricks data, you can create Databricks datasets to use for analysis.
To create a dataset using Databricks
• Choose Datasets at left, then scroll down to find the data source card for your Databricks connection. If you have many data sources, you can use the search bar at the top of the page to find your data source with a partial match on the name.
• Choose the Databricks data source card, and then choose Create data set.
The following popup displays:
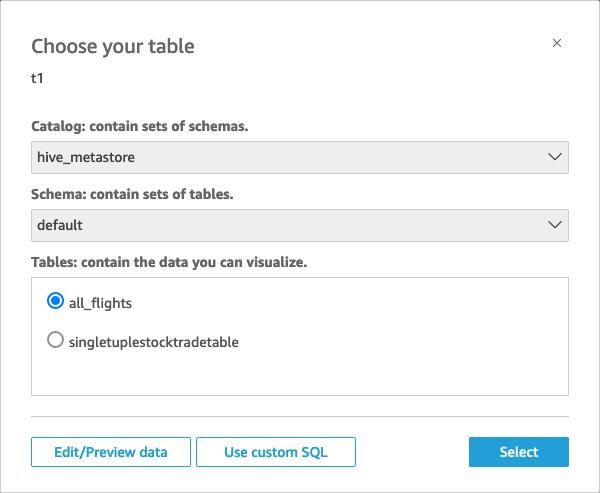
• To specify the table, you want to connect to, first select the Catalog and Schema you want to use. Then, for Tables, select the table that you want to use. If you prefer to use your own SQL statement, select Use custom SQL.
• Choose Edit/Preview.
• (Optional) To add more data, use the following steps:
1. Choose Add data at top right.
2. To connect to different data, choose Switch data source, and choose a different dataset.
3. Follow the UI prompts to finish adding data.
4. After adding new data to the same dataset, choose Configure this join (the two red dots). Set up a join for each additional table.
5. If you want to add calculated fields, choose Add calculated field.
6. Clear the check box for any fields that you want to omit.
7. Update any data types that you want to change.
• When you are done, choose Save to save and close the dataset.
Thank You
Prashanth Kanna
Helical IT Solutions

Best Open Source Business Intelligence Software Helical Insight is Here