This blog will elaborate about Installation of Pentaho 5.0.1 CE with Postgresql db (in Windows 7 / Ubuntu / AWS)
1.Putty configuration
Step-1: Go to start menu and click putty or Desktop find where is putty.
Step-2: Just provide IP Address or host name of client machine. See the below image and provide Host name in red rectangle area.

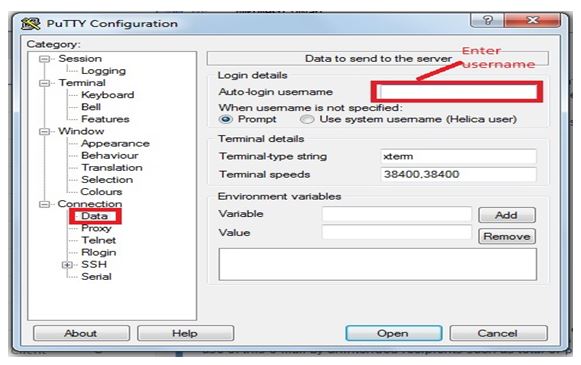
Step-3: After that go to connection tab > Data and provide username of client machine. In below image you can see and follow the steps.
Step-4: After that browse and upload the .ppk file.In below image you can see the procedure how to go there and provide .ppk file, and click Open button.

2.Java Configeration
PART- I JAVA (Open – JDK)- Installation
Installation of JAVA(Open JDK) in ubntu server
NOTE : You must issue sudo(Superuser do) permission before you ready to install java
Command : sudo su
In the next line : You need to issue the password that you used for log-ing using PuTTY.
* Install Open JDK and JRE using the below commands
1) JAVA installation command.
apt-get install oracle-java7-installer
2) Find whether java installed or not
which java
Ouptut
/usr/bin/java
3) Find which version installed
java -version
Ouput
java version “1.7.0_51”
OpenJDK Runtime Environment (IcedTea 2.3.10) (7u25-2.3.10-1ubuntu0.12.04.2)
OpenJDK 64-Bit Server VM (build 23.7-b01, mixed mode)
IMP: NOTE-1
You need NOT to set JAVA_HOME if you see the above message(when you issue java -version) for ubntu server, at the time of java installation it will set the JAVA_HOME.
This may differ from version to version for ubntu server.
NOTE-2
By default the open JDK install in the below location
/usr/lib/jvm/
NOTE-3 ( Optional – set java_home)
Open .bashrc file using an editor. If you use VI then
vi ~/.bashrc
and add the following 2 lines in your .bashrc file.
JAVA_HOME=/usr/lib/jvm/jdk1.7.0_21/
export JAVA_HOME
3.Pentaho Bi-Server Configuration
PART- II Pentaho 5.0.1 CE installation
1) Create a folder under home
mkdir pentaho
2) Download pentaho
Issue the below command to down load pentaho zip file from sourceforge site.
wget http://sourceforge.net/projects/pentaho/files/Business Intelligence Server/5.0.1-stable/biserver-ce-5.0.1-stable.zip/
3) Unzip file
i) Once the down load is completed you will be getting “biserver-ce-5.0.1-stable.zip” zip file under pentaho
ii) unzip the file using below command
unzip biserver-ce-5.0.1-stable.zip
NOTE: if unzip is not installed in ubuntu server issue the below command to install unzip package
sudo apt-get install unzip
4) biserver-ce folder
i) Once unzip completed you will be getting a folder biserver-ce
ii) Do the following.
root@———–#/opt/pentaho# cd biserver-ce
root@———-#/opt/pentaho/biserver-ce# ls
OUTPUT
data import-export.sh pentaho-solutions set-pentaho-env.bat start-pentaho.bat start-pentaho-debug.sh stop-pentaho.bat third-party-tools
import-export.bat licenses promptuser.js set-pentaho-env.sh start-pentaho-debug.bat start-pentaho.sh stop-pentaho.sh tomcat
NOTE : You need to give the permissions to the .sh files to run
Issue below command : chmod -R 777
5) Start the bi server using below command
[root@ip-10-80-147-44 biserver-ce]# ./start-pentaho.sh
OUTPUT
/opt/pentaho/biserver-ce
/opt/pentaho/biserver-ce
DEBUG: _PENTAHO_JAVA_HOME=/usr/lib/jvm/jre
DEBUG: _PENTAHO_JAVA==/usr/lib/jvm/jre/bin/java
Using CATALINA_BASE: /opt/pentaho/biserver-ce/tomcat
Using CATALINA_HOME: /opt/pentaho/biserver-ce/tomcat
Using CATALINA_TMPDIR: /opt/pentaho/biserver-ce/tomcat/temp
Using JRE_HOME: /usr/lib/jvm/jre
Using CLASSPATH: /opt/biserver-ce/tomcat/bin/bootstrap.jar
NOTE: stop the server by issuing this command
root@ —— :/opt/pentaho/biserver-ce# ./stop-pentaho.sh
root@ONE-DMZ-SRV161:/home/pentaho/biserver-ce# ./stop-pentaho.sh
/opt/pentaho/biserver-ce
/opt/pentaho/biserver-ce
DEBUG: _PENTAHO_JAVA_HOME=
DEBUG: _PENTAHO_JAVA=java
Using CATALINA_BASE: /opt/pentaho/biserver-ce/tomcat
Using CATALINA_HOME: /opt/pentaho/biserver-ce/tomcat
Using CATALINA_TMPDIR: /opt/pentaho/biserver-ce/tomcat/temp
Using JRE_HOME: /usr/lib/jvm/jre
Using CLASSPATH: /opt/biserver-ce/tomcat/bin/bootstrap.jar
6) Go the web-browser and give the below URL
http://YourHost:8080/pentaho
Example : 192.168.56.92:8080/pentaho
NOTE: pentaho by default uses 8080 port number.
Note: Below process is applicable for window machine not linux machine.
If you want to change default port number then follow steps like D:\Software\biserver-ce-5.0.1-stable\biserver-ce\tomcat\conf\server.xml Find the port no. 8080 and replace port number according to requirement and save the file and exit.
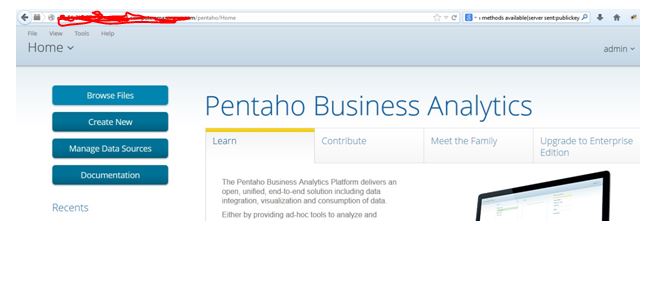
4.Pentaho Home Page
Credentials you need to supply once you get the home page are :
User name : Admin
Password : password
7) After that click Home and go to market place and Install Plugging like according to requirement like Community Dashboard Editor (CDE),Community Dashboard DataAccess, Community Dashboard Framework, Saiku Analytics etc.
8) And once stop the Bi-server and again restart server server.
Rohit Verma

Best Open Source Business Intelligence Software Helical Insight is Here